How to Blur Image Background: A Better Way with Remove.photos
Summary
Most background blur tools simply overlay your subject on a blurred original, leaving visible ghosting artifacts. Discover how Remove.photos uses AI inpainting to reconstruct the background before blurring, producing cleaner results with a drag-to-reposition feature.
Blur Image Background
Why most blur tools leave ugly ghost outlines — and how Remove.photos solves it with AI inpainting
Why Blur the Background of a Photo?
Background blur — often called the bokeh effect — is one of the most sought-after techniques in photography and image editing. It draws the viewer's attention to the subject by softening distracting surroundings.

Original photo — the background is sharp and distracting
Portrait Photography
Separate your subject from busy backgrounds to create professional-looking headshots, profile pictures, and social media content.
Product Photography
Highlight your products by blurring cluttered surroundings, making them stand out in e-commerce listings and marketing materials.
Privacy Protection
Obscure sensitive information, license plates, bystanders, or confidential documents visible in the background of your images.
Video Calls & Presentations
Create clean thumbnail images and cover photos for virtual meetings and online presentations by blurring messy environments.
How Typical Background Blur Tools Work
Most online background blur tools — including popular options like Canva, Fotor, and PhotoRoom — follow the same basic pipeline:
Subject Detection
The tool uses AI or edge detection to identify the main subject (person, object, etc.) in your photo and creates a mask around it.
Blur the Original Image
The entire original image — including the area occupied by the subject — is passed through a Gaussian blur filter.
Overlay the Subject
The sharp, extracted subject is placed back on top of the blurred image in its original position.
The Problem: Ghost Outlines
Because the original image is blurred with the subject still in it, the subject's silhouette remains visible in the blurred background as a soft, ghostly outline. This is especially noticeable when:
- The subject has high contrast against the background (e.g., a person in dark clothing against a light wall)
- The subject has distinctive shapes or colors that bleed through the blur
- You use a strong blur intensity, which paradoxically makes the ghosting more visible, not less
The result is a clearly artificial-looking image where the viewer can still see the blurred contour of the subject behind the sharp version — a dead giveaway that the blur was applied in post-processing.

Typical tool result — notice the blurred ghost silhouette of the subject visible behind her
How Remove.photos Does It Better
Remove.photos takes a fundamentally different approach to background blur. Instead of simply blurring the original image, it reconstructs the background first — then blurs the clean result.
Subject Extraction
Like other tools, Remove.photos first detects and extracts the main subject from the image using advanced AI segmentation.
AI Background Inpainting
Here is where Remove.photos diverges: instead of keeping the original image underneath, it uses AI-powered inpainting to fill in the region where the subject was. The background is intelligently reconstructed as if the subject was never there — textures, patterns, and colors are seamlessly extended to cover the gap.

Inpainting result — the subject is removed and the background is intelligently filled in, as if no one was ever there
Blur the Reconstructed Background
Only after inpainting is the background blurred. Since the subject has been completely removed and filled in, there is no ghosting, no silhouette, no visible artifact — just a smooth, natural-looking blur.
Composite the Subject
The sharp subject is composited back onto the cleanly blurred background, producing a professional result that rivals optical bokeh from a real camera lens.

Remove.photos result — perfectly clean bokeh background with zero ghost artifacts
Unique Advantages
Zero Ghost Artifacts
Because the subject area is fully inpainted before blurring, there is absolutely no trace of the original subject's outline in the blurred background.
Drag-to-Reposition Subject
Since the background is fully reconstructed, you can freely drag the subject to any position in the image. Move a person from the left side to the center, or recompose the shot entirely — the background stays seamless.
3 Distinct Blur Modes
Unlike other tools that only offer a single Gaussian blur, Remove.photos provides three creative blur styles to match your vision:
- Gaussian Blur — The classic, smooth depth-of-field effect that mimics a wide-aperture camera lens. Perfect for natural-looking portraits and product shots.
- Luminous Halo — Transforms background light sources into dreamy, glowing orbs, creating a cinematic bokeh effect popular in night photography and glamour shots.
- Motion Blur — Adds a directional blur that simulates camera movement or subject speed. Great for action photos or adding a sense of dynamic energy to still images.
Fast & Free Online
No software installation or account required. Upload your image, adjust the blur, reposition if needed, and download the result — all in your browser.
Subject Outline Effect
Add a stylish outline around your subject to make it pop even more against the blurred background. Choose outline color and thickness to create eye-catching visuals for social media posts, thumbnails, and marketing materials.
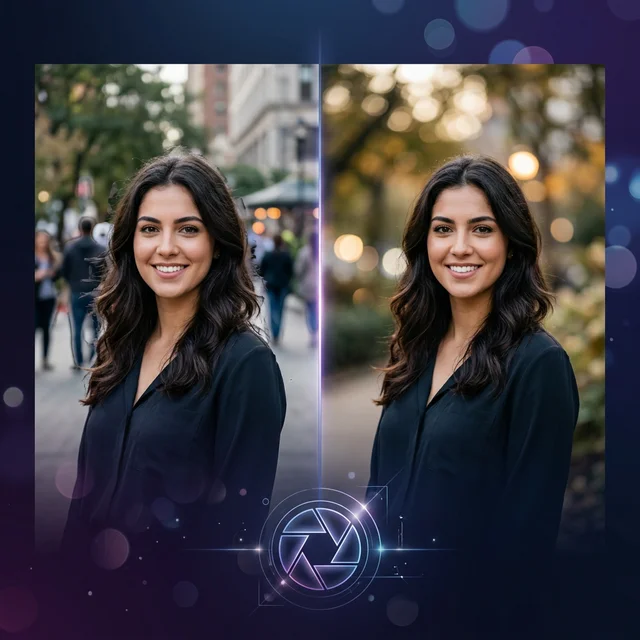
Side-by-Side Comparison
Here's how the two approaches compare when applied to the same image:
Typical Tool — Ghost Outline
Remove.photos — Clean Result
| Aspect | Typical Tools | Remove.photos |
|---|---|---|
| Background Processing | Blur original image (subject included) | Remove subject → Inpaint → Then blur |
| Ghost Outline | ✗ Visible blurred silhouette of the subject | ✓ Completely clean, no traces |
| Subject Repositioning | ✗ Not possible (ghost stays in original position) | ✓ Freely drag subject anywhere |
| High Blur Intensity | ✗ More blur = more visible ghosting | ✓ Clean at any blur level |
| Result Quality | Acceptable for mild blur, breaks down at strong blur | Professional quality at all blur levels |
| Blur Modes | ✗ Gaussian only | ✓ Gaussian, Luminous Halo & Motion |
| Subject Outline | ✗ Not available | ✓ Customizable outline around subject |
| Price | Usually free or freemium | Free — no account needed |
How to Blur Your Image Background with Remove.photos
Follow these simple steps to get a professional background blur using Remove.photos:
Open Remove.photos
Navigate to https://remove.photos in your browser. No registration or account is required.
Upload Your Image
Click the upload area or drag and drop your image onto the page. The tool supports common formats including JPG, PNG, and WebP.
Select "Blur Background"
Once your image is processed, choose the Blur Background option from the available tools. The AI will automatically extract your subject, inpaint the background, and apply the blur effect.
Adjust Blur Intensity
Use the blur intensity slider to control how much blur you want. Preview the changes in real time. Since there's no ghosting, even maximum blur looks natural.
Reposition Your Subject (Optional)
This is where the magic happens — simply click and drag your subject to any position on the canvas. Want to center yourself in a group photo? Move a product to the rule-of-thirds intersection? Just drag it there.
Download Your Result
When you're satisfied with the result, click the download button to save the high-resolution output to your device.
Tips for the Best Results
Use High-Resolution Images
Higher resolution gives the AI more data to work with for both subject detection and background inpainting, leading to cleaner edges and better fill quality.
Start with Medium Blur
Begin with a moderate blur level and increase gradually. A subtle blur often looks more natural and professional than an extreme one.
Use Repositioning Creatively
When recomposing, consider the rule of thirds. Place your subject at one of the intersection points for a more dynamic and visually appealing composition.
Check the Edges
After downloading, zoom in to the edges of your subject. Remove.photos typically handles hair and fine details well, but it's always good to verify for your specific use case.
Conclusion
Background blur is a powerful technique for enhancing photos, but not all blur tools are created equal. Traditional tools take a shortcut by simply blurring the original image and overlaying the subject — a quick fix that produces visible ghost outlines, especially at higher blur intensities.
Remove.photos solves this by adding an intelligent inpainting step that reconstructs the background before applying the blur. The result is a genuinely clean, artifact-free blur that looks as natural as optical bokeh from a real camera. The ability to drag and reposition your subject is the cherry on top — something that simply isn't possible with the traditional approach.
If you're looking for the best free online tool to blur your image backgrounds, give Remove.photos a try. The difference is immediately visible.